
This post describes the process of integrating Ouster OS1 lidar data with Google Cartographer to generate 2D and 3D maps of an environment. While we work internally on our own HD mapping solution, this post walks through how you can get started with basic mapping using an open source program, like Google Cartographer.
Cartographer is a system that provides real-time simultaneous localization and mapping (SLAM) in 2D and 3D across multiple platforms and sensor configurations. SLAM algorithms combine data from various sensors (e.g. lidar, IMU, and cameras) to simultaneously compute the position of the sensor and a map of the sensor’s surroundings. SLAM is an essential component of autonomous platforms such as self-driving cars, automated forklifts in warehouses, robotic vacuum cleaners, and UAVs. A detailed description of Cartographer’s 2D algorithms can be found in their ICRA 2016 paper.
Map making with Google Cartographer
Map making with Google Cartographer
Cartographer Installation
Cartographer supports the following ROS distributions:
- Indigo
- Kinetic
- Lunar
- Melodic
Google provides detailed instructions for building and installing Cartographer for ROS from source. Alternatively, the ROS packages can be downloaded from the debian repository. The commands below will install the necessary packages for the ROS Melodic distribution:
$ sudo apt-get install ros-melodic-cartographer ros-melodic-cartographer-ros ros-melodic-cartographer-ros-msgs ros-melodic-cartographer-rviz
Google also provides sample data and instructions to demonstrate the 2D and 3D map making abilities.
Cartographer Process Overview
Cartographer primarily consists of two subsystems, global SLAM and local SLAM. Local SLAM is used to generate good submaps of the region and global SLAM is used to tie the submaps together as consistently as possible.
Local SLAM generates a series of submaps which are meant to be locally consistent but drift over time. Local SLAM also creates the local trajectory. Global SLAM runs in separate threads and finds loop closure constraints between submaps generated by local SLAM. It executes loop closure by scan matching scans of sensor data against the submaps. It also incorporates other sensors to attempt to get the most consistent global solution.

Google Cartographer System Overview
Google Cartographer System Overview
The primary input to the cartographer SLAM algorithm are distance measurements which are computed from range finding sensors such as lidar sensors or radars. These sensors inherently have noise, so the first data processing step is to apply a bandpass filter to remove measurements outside of a minimum and maximum range threshold. These values are derived from the physical characteristics of the specific sensors used.
High-resolution lidar sensors like the OS1-64 produce a large number of measurements which can slow down computation time. To address the point density problem, Cartographer uses a voxel filter that downsamples raw points into cubes of a constant size and only keeps the centroid of each cube. Cartographer applies an adaptive voxel filter which tries to determine the optimal voxel size to achieve a target number of points.
After the data is filtered, the local SLAM algorithm inserts the scan into the current submap via scan matching. This process uses an initial guess from the pose extrapolator algorithm which uses other sensors to make an initial prediction of where the scan should be inserted into the submap.
Cartographer provides the CeresScanMatcher and RealTimeCorrelativeScanMatcher scan matchers. The CeresScanMatcher typically preferred. It is fast but cannot fix errors that are significantly larger than the resolution of the submaps. The RealTimeCorrelativeScanMatcher is very expensive and will essentially override any signal from other sensors but the range finder, but it is robust in feature-rich environments.
Once a scan match is computed, a motion filter ensures that only scans resulting from significant motion based on distance, angle or time are included in the submap. A submap is considered as complete when the local SLAM has received a given amount of range data. The local SLAM algorithm stores the submaps and their range data in a data structure known as a probability grid.
The global SLAM algorithm takes the submaps and attempts to rearrange them so that they form a coherent global map. This is a type of GraphSLAM, a pose graph optimization which works by building constraints between nodes and submaps and then optimizing the resulting constraints graph.
When a node and a submap are considered for constraint building, they go through a first scan matcher called the FastCorrelativeScanMatcher. Once the FastCorrelativeScanMatcher has a good enough proposal (above a minimum score of matching), it is then fed into a Ceres Scan Matcher to refine the pose.
For more detailed information on the algorithms involved, see the Algorithm walkthrough for tuning page.
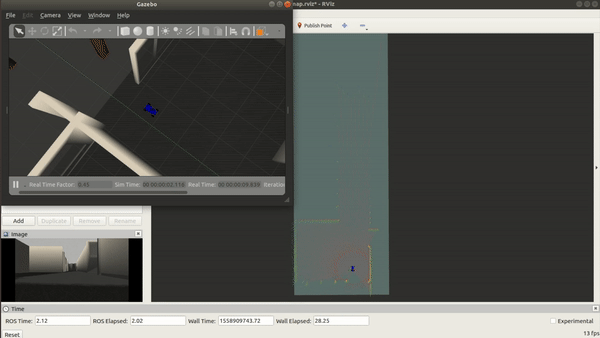
Running Cartographer in Simulation
Using the ROS nodes provided by Cartographer, it’s possible to configure a simulated robot and sensor suite and operate the robot in a simulated world through ROS Gazebo. ROS’s RViz tool can then be used to view the map and trajectory generated by Cartographer. The Cartographer ROS packages have been integrated into the diy_driverless_car_ROS repository.
For this process, we will use a simulated OS1-64 lidar sensor to get IMU and distance measurements. A detailed description of the development of the simulated sensor is available here. The OS1-64 will be mounted on a simulated RC car provided by the MIT RACECAR project. Last, we will use the WillowGarage world as the simulated environment to operate the system and create the map. A sample image of the OS1-64 mounted on the racecar platform in the WillowGarage Gazebo environment is below:

OS1 RC Car Gazebo Simulation
OS1 RC Car Gazebo Simulation
Lua Configuration File
The first file defined is a .lua configuration file. The robot configuration is read from a options data structure that must be defined from a Lua script. The .lua file should be specific to the robot. For this simulation, the racer_2d.lua is used to define the Cartographer configuration for this robot.
First, we will define the TF frame IDs of the environment and the robot. These coordinate frames are defined in REP 105.
map_frame = "map",
tracking_frame = "os1_imu",
published_frame = "base_link",
odom_frame = "odom",
The map_frame is the ROS frame ID to use for publishing submaps.
The tracking_frame is the ROS frame ID of the frame that is tracked by the SLAM algorithm, usually the IMU frame if it is used.
The published_frame is the ROS frame ID to use as the child frame for publishing poses. Since we will configure Cartographer to publish odometry, we set this to “base link”.
The odom_frame is set to “odom” if Cartographer is configured to publish odometry. This frame publishes the non-loop-closed local SLAM result.
Next, we configure Cartographer to publish the local, non-loop-closed, continuous pose as the odom_frame.
provide_odom_frame = true,
The use_odometry, use_nav_sat, and use_landmarks settings are all set to false since we will not have any odometry, GPS, or landmark inputs.
We will be inputting the OS1-64 lidar data as a 2D laser scan. We set the num_laser_scans field to enable Cartographer to process the point cloud information on the /scan topic and define the number of sensor_msgs/LaserScan topics to use.
num_laser_scans = 1,
There is one global variable that needs to be configured based on the sensor properties. The TRAJECTORY_BUILDER_2D.num_accumulated_range_data variable defines the number of messages required to construct a full scan (typically, a full revolution). The default value for this field is 1 in the base trajectory_builder_2d.lua file which is correct since the OS-1-64 outputs a single message per revolution.
Explanations for the remaining values are detailed in the Lua configuration reference documentation.
URDF File
It’s possible to distribute the robot’s TF tree from a /tf topic or define it in a .urdf robot definition. We will use the os1_sensor.urdf file to define the transform between the IMU, laser aperture, and sensor enclosure.
The os1_sensor.urdf file defines the sensor enclosure link, “os1_sensor”, as the base link. This link has two children. The “os1_imu” link represents the IMU location and the “os1_lidar” link represents the laser aperture location. This creates the following TF tree which correctly matches the TF tree provided by the Ouster ROS sensor client.

OS1 Transform Tree
OS1 Transform Tree
The specific rotations and translations between the components are also defined in the .urdf file. These dimensions are taken from the OS1 Datasheet.
Launch File
The recommended usage of Cartographer is to provide a custom .launch file per robot and type of SLAM. For this simulation, we will be doing 2D slam with simulated IMU and laser scan data as inputs. The Cartographer ROS settings are configured in the racer_2d_cartographer.launch file.
The os1_sensor.urdf file is loaded and the robot_state_publisher node publishes the state defined in the URDF file to the /TF topic.
The cartographer_ros node is also initialized, configured by loading the racer_2d.lua file. We also remap the IMU and laser scan data from their default topics to the topics output by the simulated robot and OS-1 sensor.
<remap from="scan" to="/scan_sim" />
<remap from="imu" to="/os1_cloud_node/imu" />
Lastly, the cartographer_occupancy_grid_node is run. The occupancy_grid_node listens to the submaps published by SLAM, builds a ROS occupancy_grid out of them and publishes it. Generating the map is expensive and slow, so map updates are in the order of seconds.
This launch file is then integrated into the broader system simulation launch file.
Running the Simulation
The entire simulation is defined by the rc_laser_map.launch file. This file loads the simulation as well as all the relevant supporting ROS nodes to produce the required data for Cartographer to function.
The first portion of the file defines default values for several parameters that can be used to customize the simulation. These values can be overwritten via the command line when launching the simulation.
Next, the Gazebo simulation is started by loading the appropriate world file and spawning the robot with its integrated sensors. Then several nodes are loaded that allow the user to control the robot via the keyboard or joystick. The pointcloud_to_laserscan node is then loaded to convert the 3D pointcloud to a 2D laser scan. This makes computation simpler and also increases the flexibility of the system. Some ROS nodes only support LaserScan inputs and not PointCloud2 inputs. Lastly, the racer_2d_cartographer.launch file is executed which launches Cartographer with its specific configurations described earlier.
The video below shows the vehicle navigating the environment. Cartographer provides an RViz plugin which allows the visualization of submaps, the trajectory, and constraints.
OS1 RC Car Cartographer ROS Gazebo Simulation
OS1 RC Car Cartographer ROS Gazebo Simulation
Once the environment is sufficiently mapped the map file can be saved and it can be loaded later. This is done with the map_server ROS package
rosrun map_server map_saver -f /tmp/my_map
This creates two files. The YAML file describes the map metadata, and names the image file. The image file encodes the occupancy data. An example image of the occupancy grid map is shown below:

OS1 RC Car ROS Simulation Cartographer Map
OS1 RC Car ROS Simulation Cartographer Map
Running on Real-world Data
The next step is to move from the simulated environment to the real world environment. Since the Cartographer system setup was validated in simulation, it’s fairly straightforward to develop a working implementation on data collected in the real world. There will be some minor changes and parameter tuning to reflect the real world environment. We will run Cartographer in both 2D and 3D modes on data collected from an OS-1-64 mounted on a push cart and also from an OS-1-64 mounted on an RC car.
Indoor Data Collection
The first step is to collect data from your environment. Before running everything on the integrated RC car, we will collect data in a simpler and more controlled environment. In the first example, an OS-1-64 is mounted to a cart with a laptop as shown in the image below.

OS1 Cart Mount for Data Collection
OS1 Cart Mount for Data Collection
The cart was manually pushed around the office. The standard ouster_ros sensor client package was used to configure the sensor and interface with ROS. The os1_cloud_node/points and os1_cloud_node/imu topics were recorded.
Validate ROS .bag File
Cartographer ROS provides a tool named cartographer_rosbag_validate to automatically analyze data present in your bag. It is generally a good idea to run this tool before trying to tune Cartographer for incorrect data.
It benefits from the experience of the Cartographer authors and can detect a variety of mistakes commonly found in bags. The tool can also provide tips on how to improve the quality of your data.
The tool can be run with the following command:
rosrun cartographer_ros cartographer_rosbag_validate -bag_filename <bag filename>
This produces the following output:

Cartographer ROSbag Validation Output
Cartographer ROSbag Validation Output
Run Cartographer
We will use the demo_cart_2d.launch file to replay the collected data and run Cartographer. This file loads Cartographer via the cart_2d.launch file, launches RViz preconfigured with the demo_2d.rviz settings, and replays the bag file passed via the bag_filename parameter on the command line.
The cart_2d.launch file loads the os1_sensor.urdf file to get the transformations between the IMU and sensor components required by Cartographer. It then launches the cartographer_node loading the cart_2d.lua configuration file. There are a couple of changes from the configuration files used in simulation:
- There is no source of odometry on the cart:
use_odometry = false
- We are using the full
PointCloud2message and not aLaserScanmessage:num_laser_scans = 0,num_point_clouds = 1,
As before, the default input topics are remapped to reflect the topic names output by the system in the cart_2d.launch file. Since we are reading PointCloud2 topics, the “points” topic is remapped instead of the “scan” topic.
<remap from="points2" to="/os1_cloud_node/points" />
<remap from="imu" to="/os1_cloud_node/imu" />
Lastly, the cartographer_occupancy_grid_node is launched to produce the map.
The complete process is executed with the following command:
$ roslaunch rover_2dnav demo_cart_2d.launch bag_filename:=cart.bag
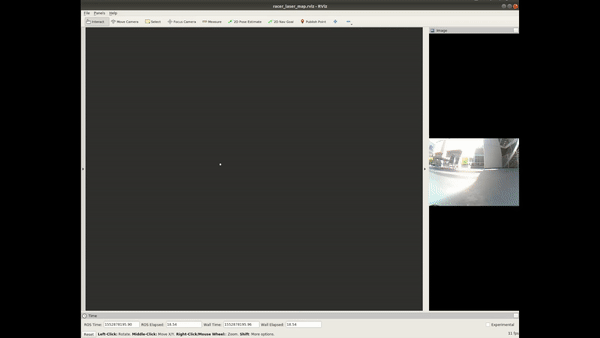
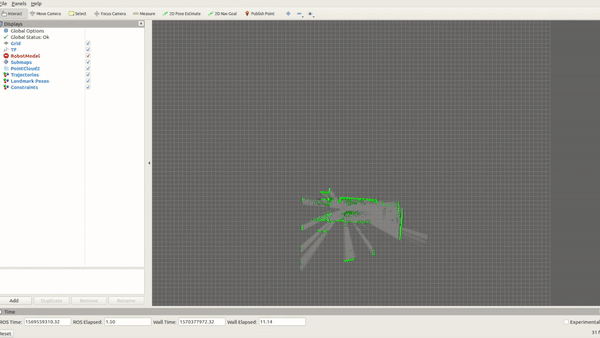
You can monitor the progress of the map generation via RViz as shown in the image below:
OS1 Cartographer Map Generation in RViz
OS1 Cartographer Map Generation in RViz
The complete, final map is shown below:

OS1 Map Generated by Cartographer
OS1 Map Generated by Cartographer
Running Cartographer on an RC Car
Now that the Cartographer can run on real-world data, we can integrate Cartographer into a complete robotic system. For this example, we will mount the OS1-64 to an RC car platform. The system also has an OpenMV camera mounted, but this isn’t used by the Cartographer system. The vehicle can be operated remotely with an Xbox controller. All processing is done on a fitlet2 with an Arduino Uno providing commands to the motors for steering and throttle. This set-up closely mimics the simulated system used earlier.
The complete system looks like this:

RC Car with Ouster OS1 and OpenMV Cam
RC Car with Ouster OS1 and OpenMV Cam
When working with the RC car, the diy_driverless_car_ROS repository is used, specifically the rover_2dnav package. When manually operating the RC car, the rc_dbw_cam.launch launch file is used to start the system.
Run 2D Cartographer Online
The rc_dbw_cam.launch loads the joystick node to process steering and throttle commands from the Xbox controller. These are then sent to the L298N_node which communicates with the Arduino Uno. The rc_control.launch file is loaded which handles some control message conversions and launches an Extended Kalman Filter via the robot_localization package. The EKF node computes the odometry information that is later sent to Cartographer. The OpenMV camera driver node is launched as well as the OS-1 ROS client.
Cartographer can be run by setting the map argument to True via the command line when launching the rc_dbw_cam.launch file. This launches the pointcloud_to_laserscan node as well as Cartographer via the racer_2d_cartographer.launch file.
As described earlier, the os1_sensor.urdf file loads the component transforms and configurations from the racer_2d.lua file.
The system is launched by executing the following command:
$ roslaunch rover_2dnav racer_map.launch rviz:=true map:=true cartographer:=true
An image of the online map generation while manually controlling the RC car is shown below:
OS1 RC Car Cartographer Map Generation in RViz
OS1 RC Car Cartographer Map Generation in RViz
Run Cartographer 3D Pipeline Offline
When operating the RC car, we want to limit the amount of processing resources utilized by mapping so those resources can be used for other perception, path planning, or controls functions that may also be running. However, if we process the collected data offline, we are less constrained by runtime constraints.
The offline_node is the fastest way of SLAMing a bag of sensor data. It does not listen on any topics, instead, it reads TF and sensor data out of a set of bags provided on the command line. In all other regards, it behaves like the cartographer_node.
Cartographer operates in both a 2D and 3D mode. The 2D pipeline estimates a trajectory of 3DoF (x,y, yaw) poses by matching 2D scans in 2D submaps. In contrast, the 3D pipeline estimates a trajectory of 6DoF (x,y,z, roll, pitch, yaw) poses by matching 3D scans in 3D submaps. In 3D, RViz only shows 2D projections of the 3D hybrid probability grids (in grayscale).
If you use 2D SLAM, range data can be handled in real-time without an additional source of information so an IMU is optional. With 3D SLAM, you need to provide an IMU because it is used as an initial guess for the orientation of the scans, greatly reducing the complexity of scan matching.
To launch the RC car data offline, run:
$ roslaunch rover_2dnav offline_rc_3d.launch bag_filenames:=patio_16mar2.bag rviz:=true
This launch file loads configurations from the racer_3d.lua file. This configuration subscribes to PointCloud2 topics instead of LaserScan messages:
num_laser_scans = 0,
num_subdivisions_per_laser_scan = 1,
num_point_clouds = 1,
The offline_rc_3d.lunach file also remaps the points2 and imu topic so the offline node can process the full pointcloud instead of just the laser scan.
<remap from="points2" to="/os1_cloud_node/points" />
<remap from="imu" to="/os1_cloud_node/imu" />
Run Cartographer Assets Writer Pipeline
As Cartographer is running the SLAM algorithm, it continually updates the state to the most recent best estimate of the robot’s trajectory and environment. This results in the final trajectory and map being the most accurate Cartographer can provide.
Cartographer serializes its internal state in a .pbstream file format which contains the data structures used by Cartographer internally. Cartographer ignores most of the sensor data it processes so that it can run efficiently. However, Cartographer allows for a combination of the mapping and trajectory information stored in the .pbstream file with the original sensor data stored in a .bag file using cartographer_assets_writer to create a high-resolution map.
When running Cartographer with an offline node, a .pbstream file is automatically saved. This can be observed when running the RC car example shown previously:
$ roslaunch rover_2dnav offline_rc_3d.launch bag_filenames:=patio_16mar2.bag rviz:=true
In the terminal output, you can see the .pbstream file is saved:

Cartographer Offline Processing OS-1 RC Data
Cartographer Offline Processing OS-1 RC Data
Alternatively, you can use the exposed Cartographer services explicitly finish the current trajectory and make Cartographer serialize its current state when running Cartographer in online mode.
As described previously, we can run Cartographer online by the following command:
$ roslaunch rover_2dnav racer_map.launch rviz:=true map:=true cartographer:=true
Finish the first trajectory:
$ rosservice call /finish_trajectory 0
Ask Cartographer to serialize its current state into a .pbstream:
$ rosservice call /write_state xyz_your_file_name.pbstream
This will also generate a .pbstream file.
Once you have the .pbstream file, a pipeline configuration is specified with a .lua file to control the data processing. The pipeline can be used to color, filter and export SLAM point cloud data into a variety of formats. For specific information, refer to Exploiting the map generated by Cartographer ROS.
The assets writer is modeled as a pipeline of PointsProcessors. PointsBatchs flow through each processor and they all have the chance to modify the PointsBatch before passing it on. The available PointsProcessors are all defined in the cartographer/io sub-directory and documented in their individual header files.
We will use the following components to create the pipeline.
min_max_range_filterto remove points that are either too close or too far from the sensor:action = "min_max_range_filter",min_range = 1.,max_range = 60.,
voxel_filter_and_remove_moving_objectsto voxel filters the data and only passes on points that we believe are on non-moving objects:action = "voxel_filter_and_remove_moving_objects",voxel_size = VOXEL_SIZE,
write_xray_imageCreates “X-rays,” translucent views of the map, through the points with pixels being ‘voxel_size’ big. Here we only view the map’s x and y planes.action = "write_xray_image",voxel_size = VOXEL_SIZE,filename = "xray_xy_all",transform = XY_TRANSFORM,
intensity_to_colorWe now use the intensities to color our points. We apply a linear transform to clamp our intensity values into [0, 255] and then use this value for RGB of our points. Every stage in the pipeline after this now receives colored points.write_plyto stream a PLY file to disk.action = "write_ply",filename = "points.ply",
write_probability_gridto create a probability grid with the specifiedresolutiondraw_trajectories = true,resolution = 0.05,range_data_inserter = {insert_free_space = true,hit_probability = 0.55,miss_probability = 0.49,},
filename = "probability_grid"
The complete pipeline is viewable in the assets_writer_rc_3d.lua configuration file.
We can execute the pipeline with the assets_writer_rc_3d.launch launch file. Note that we pass the .pbstream file as an argument to this launch file
$roslaunch rover_2dnav assets_writer_rc_3d.launch bag_filenames:=patio_16mar2.bag pose_graph_filename:=patio_16mar2.bag.pbstream
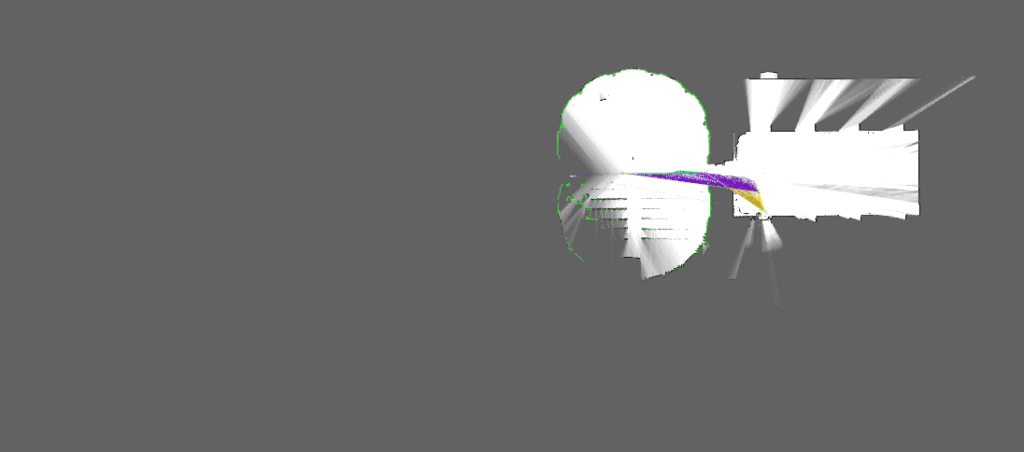
The Assets Writer Pipeline produces xray images like the one shown below:

Cartographer Xray Image from OS1 RC Car
It also produces a probability grid:

Cartographer Probability Grid from OS1 RC Car
Cartographer Probability Grid from OS1 RC Car
And a .ply file which can be viewed in a pointcloud viewer such as CloudCompare:

Cartographer .ply file from an OS1 RC Car in CloudCompare
Cartographer .ply file from an OS1 RC Car in CloudCompare
Localization Only
It’s also possible to reduce computations by using cartographer in localization-only mode. This assumes that a map of the environment already exists. Cartographer will run the SLAM algorithms against the existing map but not create a new one.
To enable this mode, we need to add the following settings:
TRAJECTORY_BUILDER.pure_localization = true
POSE_GRAPH.optimize_every_n_nodes = 20
This is reflected in the racer_2d_localization.lua configuration file.
We then use the racer_2d_cartographer_localization.launch launch file to run Cartographer with this configuration. This launch file requires the load_state_filename parameter to be set. This filename is a .pbstream file previously generated.
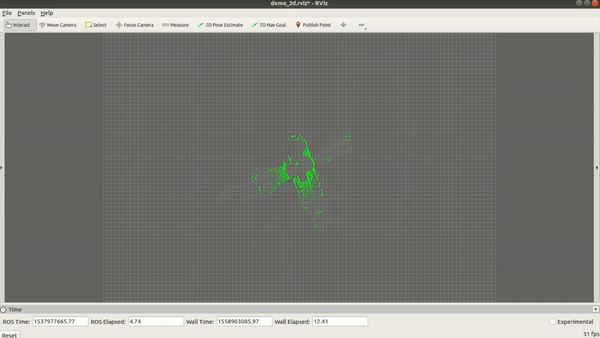
Localization is useful for enabling a vehicle to navigate autonomously. The image below shows the localization trajectory in green visualized as the RC car navigates the environment and Cartographer uses the OS1 lidar data to estimate the vehicle’s trajectory.

Cartographer Localization with OS1 and RC Car in RViz
Cartographer Localization with OS1 and RC Car in RViz
Running Cartographer in a Docker Container
Installation instructions for Docker can be found in the Docker documentation. Optionally, users can install Docker on a Linux Ubuntu platform using the provided install-docker.sh script. This script can be executed with the following commands:
$ ./install-docker.sh
You can verify your Docker installation by checking the version:
$ docker --version
Instead of building the image locally on your computer prior to running the container, it’s also possible to pull the latest image from Docker Hub. The run-docker.sh is provided which pulls the latest image and runs the container via the script. Running the run-docker.sh script pulls the latest Docker container and runs it:
$ ./run_docker
Once inside the container, all available launch files can be executed. First, we will copy some sample Ouster OS1-64 data into the docker container into the /root/bags/ directory
$ cd /root/bags
$ curl -O https://data.ouster.io/downloads/office_demo_9_25_19.bag
First, we can verify the quality of the bag using the cartographer_rosbag_validate node.
$ rosrun cartographer_ros cartographer_rosbag_validate -bag_filename /root/bags/office_demo_9_25_19.bag
We can then run Cartographer offline to generate the .pbstream file.
$ cd /root/catkin_ws/src/ouster_example/cartographer_ros/launch
$ roslaunch offline_cart_2d.launch bag_filenames:=/root/bags/office_demo_9_25_19.bag
OS-1 Cartographer Map Generation in RVIZ
OS-1 Cartographer Map Generation in RVIZ
Lastly, we can use the assets_writer_cart_2d.launch file to create images of the map.
$ roslaunch assets_writer_cart_2d.launch bag_filenames:=/root/bags/office_demo_9_25_19.bag pose_graph_filename:=/root/bags/office_demo_9_25_19.bag.pbstream
The output png files can then be viewed.
$ xdg-open office_demo_9_25_19.bag_xray_xy_all.png

Cartographer Xray Image from OS1-64
Cartographer Xray Image from OS1-64
$ xdg-open office_demo_9_25_19.bag_probability_grid.png

Cartographer Probability Grid from an OS1-64
Cartographer Probability Grid from an OS1-64
Wrapping Up
We hope this guide is helpful for getting started with the OS1 and Google Cartographer. We’re looking forward to seeing everything that you build. If you have more questions please visit forum.ouster.at or check out our online resources.
This was originally posted on Wil Selby’s blog: https://www.wilselby.com/2019/06/ouster-os-1-lidar-and-google-cartographer-integration/